Jeff's Bike and random bike related stuff from NZ

Monday, May 04, 2020

Curing 1x. Sram 1x to 2x shifting conversion

 A resource on how to reclaim your gears, from the evil "clutches" of the 1x cult, and general messing with the internal organs of Sram road levers


Keywords: Sram 1x, Sram Force, Sram Red, Sram Rival, Sram 1x to 2x conversion

This post is divided into 4 parts

1. The rant
2. Sram Force 2x transplant
3. Sram Red, cable brake organ extraction
4. 2x dropper-post actuation
5. Generation 1 SRAM levers...

=============
Not a great idea

Hindsight is a great thing but I would have thought stopping people from having a decent range of gears on gravel bikes was a foolish move. Currently, Sram only makes clutched rear deraillers for 1x usage, unlike Shimano who now have GRX and the Ultegra RX. The Shimano stuff was a very long time coming, but at least it works with 2x. Before 1x we didn't have clutches, wide-range cassettes or narrow-wide chain-rings. We did have 2 chain rings up front and a derailleur which did double duty as a chain-guide.

My recently purchased bike came with Sram Force 1x, but after realising that it was just a gutted 2x lever, I tried to track down some internal organs for it. Easier said than done. I put the word out on the street, on the forums, on the FB, and signed up to the donor programme.

6 months later my plight had reached Australia, and my friend Paul brokered a deal through his buddy Grover. At last, I had a match. I just had to wait 2 months for the gizzards to make it to my house because of the Covid lock-down !

I already had a couple of sets of Sram Red cable shifters, so I found some tutorials online and practiced on them, using it as a chance to compare the cable gizzards with the hydro gizzards. Only the red coloured shifter-drum appeared to be identical in both variants, but the word on the street is that between variants they are compatible. Eg, the Hydro stuff will all fit inside the different Hydro bodies, (Force, Rival, Apex) and the cable stuff will all fit inside the different cable bodies. Someone has said that an 11 speed shifter drum will also fit into a 10speed Hydro body. The Sram S-700.

My aim was to install a 2 speed Rival Hydro gizzard into my Force Hydro body, which was devoid of internal organs. To gather confidence in this project, I dismantled 2 different sets of Sram Red cable brake/shifters, for practice. I learnt a heap doing this, the most useful thing being the order of putting the stuff back into the brake/shifter assembly body.

==========================
Sram Force 1x has a Rival 2x transplant

With the Hydro brakes, like the Force, you don't really need to remove the brake lever blade. You do on the cable brakes, as it gives you a better shot at access to the "skewer pin" that goes through all the organs inside the brake. The shifter-drum and the shifter mechanism are held in by this pin. Forcing it out is a major PITA on the cable brakes, BUT, on the hydro brakes, the pin is hollow with an internal thread tapped into it....  there must be an official tool for screwing into the back of this pin, for its removal, although given that you cant buy these small parts, I don't know why you would sell such a tool.

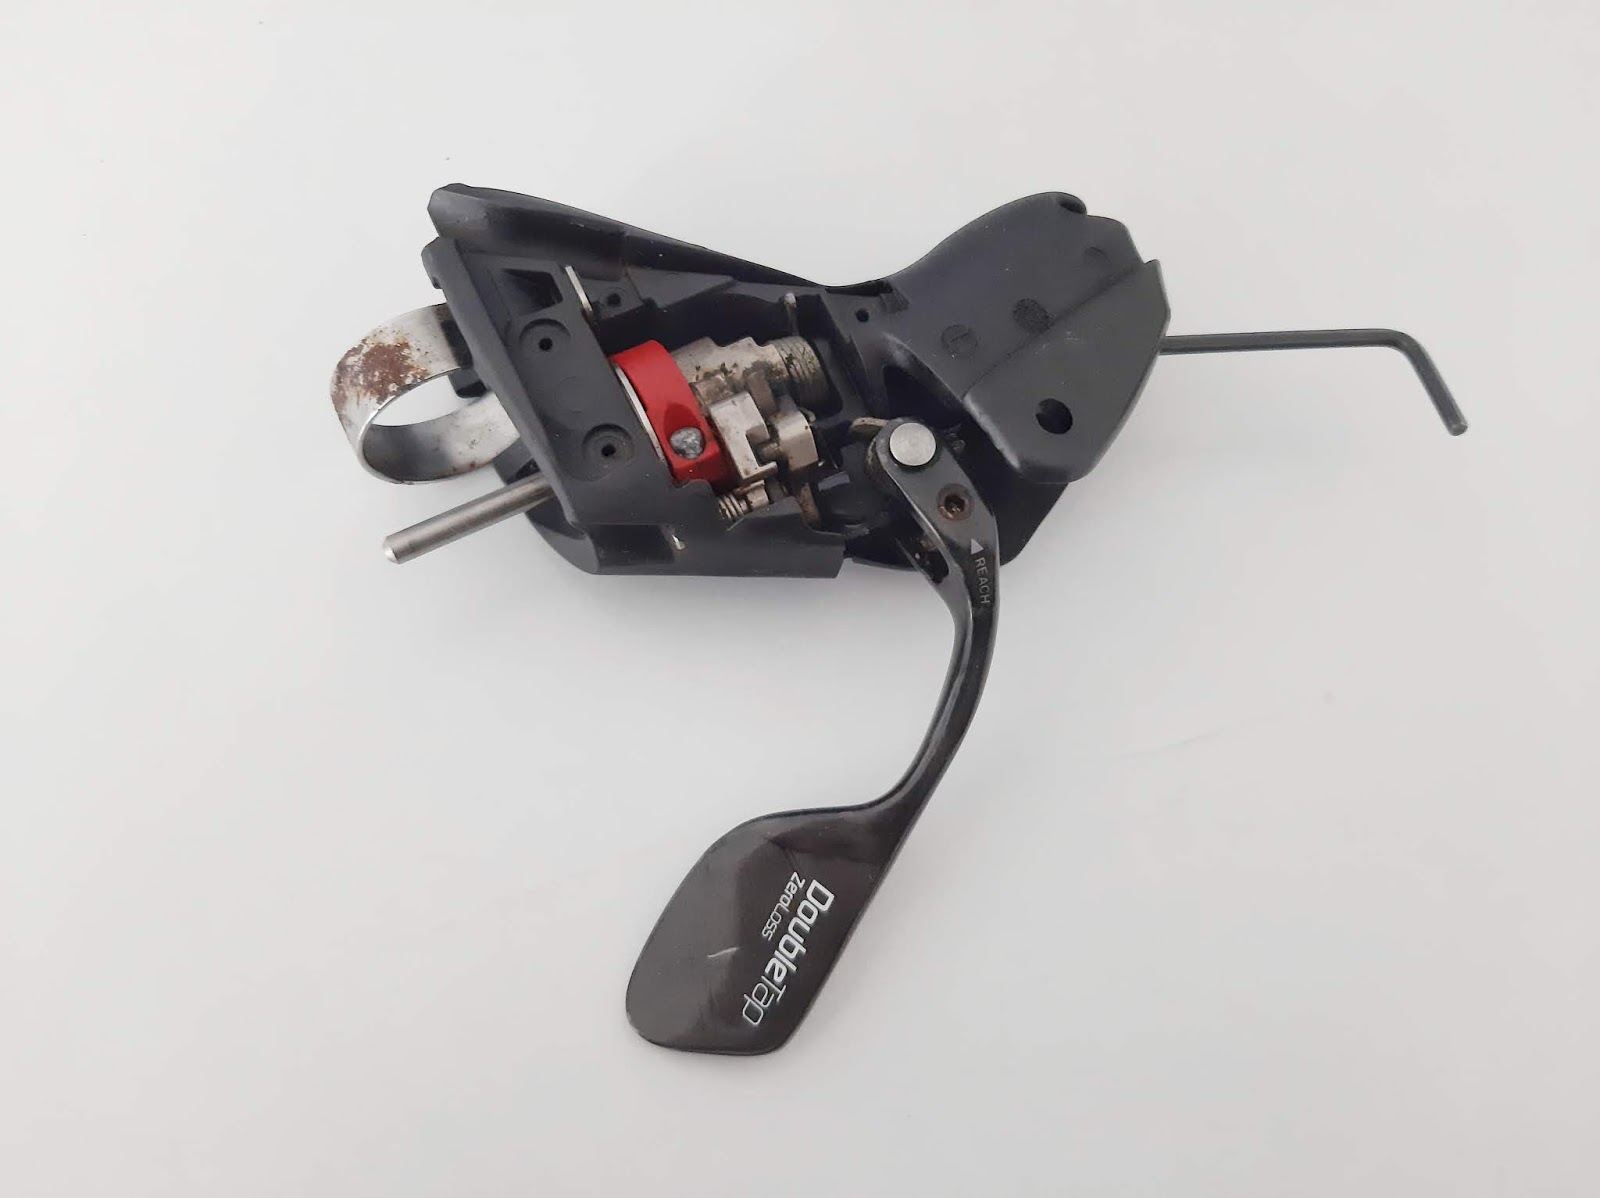
None of the above is relevant anyway, as my existing assembly is devoid of organs. I can just back off the retainer screw that stops the "skewer-pin" from backing out, and drag it out with some small pliers, after I have taken off the cover.

Top left, undo 3 screws and remove cover. Top and bottom right loosen retainer screw. Bottom left, see back of skewer-pin.

This is what you see when you take the cover off a 1x assembly.

Checkout the "skewer-pin" , your 1x should come with skewer pin still installed.

See below the gizzards Paul and Grover sent me from Australia. While its true I dismantled 2 sets of Red cable brakes for practice, I also wanted to check  how different the internals from the Red cable brakes were from the Hydro Rivals.

I just made these names up, so don't go looking for them at Sram HQ !

See the photo-grid below for the order of assembly. Left to right, in two rows.


Install the giblets in this order. Top left, the pawl with its little spring and axle. Carefully put the tiny circlip on. Don't do this in an area where you could lose the circlip if you slip.

Bottom left, pull back the pawl, and slide the shifter-drum in, being careful that the drum's springy bits are in the right place. Its pretty obvious I think. Jiggle the shift-drum around while applying pressure on the skewer-pin, which you have inserted into the skewer-pin hole, (at the back of the assembly) until the skewer pin "skewers" the shifter-drum.

Oh yes, you should adjust the reach on the brake blade so that it is as forward as it can be, this gives you more wiggle-room when inserting the paddle mechanism. When you have adjusted the brake out, you can try to insert the paddle mechanism.

Here is my technique for inserting the paddle mechanism, the last time I did it, everything went into place on my first try.

Rotate the shifter-drum upwards quite a way, maybe 90 degrees? (you have already lined it up so that the skewer-pin is holding it in place) so its not that hard to hold.

When you have rotated it up far enough, the cut-out in the drum gives you room to slide the paddle mechanism in. When you are at this point, the pawl usually slips down below the shifter-drum, into a position that is not ideal. Don't worry about it. Jigger the paddle mechanism around until you can skewer it with the skewer pin, but making sure that you hook the little spring at the top, into its proper slot. (see red arrow below).

When you have done that, rotate the shifter drum forward again, and hook the pawl out from below the shifter drum, into its proper position.

Top, red-arrow shows where the spring fits into the body.

Use the paddle a few times to check that its all good to go, then put the cover back on !

Lubrication.
I put some grease on the skewer pin. I'm sure I could add more, but at the moment I'm not sure how much to throw around, as it has potential to trap dirt in there. Google it ?

NB.  You should be able to do all the above without having to mess with any dirty hydraulic hosiery and related bleeding.

==========================
Disassembly of Sram Red, 10 speed
As mentioned earlier, the difficulty with getting the guts out of the cable braked variants is all about forcing that central skewer-pin out. It can be very tricky finding the hole at the front of the brake assembly. 

To make it a lot easier, you really need to remove the brake blade (lever) for better access, before you start on removing that skewer-pin.

There is a small circlip holding the pin that the brake blade pivots on. As usual, be careful you don't lose the circlip when you flick it off. The pin that the brake blade pivots on can sometimes get a bit stuck. Support it from below and tap it out gently with an allen key, or if stubborn, a nail punch.

Sram Red 10 speed with the brake blade pin removed.

On the top of the brake body assembly there is a small allen headed bolt. This is an adjuster that pushes a plastic block up and down inside the brake body. With simple elegance, the plastic block contacts the side of the brake blade altering its position (lever-reach). You want to wind that allen head anti-clockwise, this shifts the plastic block down it's pin, thus giving you a better line of access for when you try to push the central skewer-pin out.

On the first brake I messed with, the lower cir-clip was gone, the spring was gone, and the bolt was seized. In the second one, it worked perfectly, but while I was playing with it while writing this, it completely jammed up..... If it jams, or is already jammed, in the wrong spot, my condolences. It just means you are going to have to "jimmy stuff around" until you force something down that little hole, which you can't even see, and barely feel. It's a pretty crappy system for sure.

Some jewellers screw-drivers are really handy for all of this stuff, in particular flicking off circlips. In fact, I'm going to say, if this allen-headed bolt is still working correctly, don't mess with it too much, as in, putting it at extreme ends of its range, maybe just set it up in the middle while you try to get the central skewer-pin moving.

The position on the right is the best, as it gives you more room to jam your allen key in, when trying dislodge the skewer-pin, but given that I just managed to fatally jam the one in that photo, maybe go for a compromise and set it up in the middle.
Remember, you cant force the skewer-pin out until you have partially screwed out the little phillips screw at the back, which serves as a backstop, so the skewer-pin can't back out.

Top, the little phillips screw that needs to be backed out a bit. Bottom, the chrome skewer-pin poking out a tad having been attacked from the front end of the brake assembly. Once there are a few mm of skewer out, grab it with some small pliers.

 So jam your skinny allen key into the hole in the front and force that skewer-pin out. If it's hard to do, flip the allen key around and use the shorter end to get it started. If that cant get you in, try a jewellers screwdriver. This is the only hard part to the exercise. Have patience, dont panic, do swear. 

At this point you pull the pin out fully with some pliers.


So this is what it looks after you have pulled the central skewer-pin out. Clean it up and reninstall, or replace it with newer donor organs. The instructions for reinstalling the Hydro brake guts earlier up the page are exactly the same as for the cable brakes.


 Here is a shot (below) of a reinstall of the cable gizzards for the right hand shifter, its actually easier than the left hand shifter, when you are trying to fit the shift paddle in. Just keeping snicking the shifter drum up and up until its in about 4th gear, and it will stay there, leaving a gap for you to slot the paddle mechanism in. Easy peasy.

Stick it in 4th or 3rd gear to make room for paddle mechanism.

Big time 1x weight weeners are probably going to save 34 odd grams if the right hand gizzards weigh a similar amount to the left, why not do it, and go singles-speed ! These are lighter than most single speed levers WITH the guts installed.... 144 grams minus 34 grams is 110 grams. I dont know of any levers that are that light.


===================
Doing a 2x dropper post
I watched Joey Mesa's dropper post tutorial below, and long story short, its a complete doddle. All you need to do is remove the circlip and pin that holds the little pawl in, and remove the pawl. Put it away someone safe. You wont need to do anything else, other than take the cover off so you can get access to the pin, and I guess remove the assembly from the handlebars, so you have room to back the pawl-pin out. Just wire it up as you would for any other cable. Long term I dont know if these components will be up to the rigors of dropper-post actuation. I have my doubts but what would I know.

Everything I've learnt about Sram 2x has been picked up in one week. Joey may have a follow-up on his dropper stuff long-term.

Everyone says that the Sram internals are elegantly simple compared to other shifting innards, and I can tell it's pretty resilient, given the amount of missing or broken circlips that I am finding MIA.

Have fun dithering, and remember, I am just a backyard mechanic with luddite tendencies. 

===================
Old-school generation 1 SRAM levers
The oldest are the hardest to mess with as the shift paddle is actually 3 loose parts. A plastic bush, a simple spring, and the rest of the mechanism/frame, which sticks together. After swapping out the ratchet to the “up-speeded” one, replacing the aforementioned giblets requires a lot of manual dexterity as you are trying skewer the whole assembley with this pin that runs through everything, at the same time as you are forcing these parts onto place, against the force of the spring, while trying to keep the holes in the bush and the paddle frame aligned. Tricky as. Doable tho. 

The other thing that is different is the way the brake lever mounts. It does not have a circlip holding the pivot pin in. You have to force out the brake pin, which the lever pivots on, with a hex key or a nail punch. Check out this description on CXmagazine.com . You can see an exploded diagram of that particular lever set-up here.


===========
Relevant links
Sram tech-docs
https://www.servicearchive.sram.com/sites/default/files/techdocs/2020_sram_spc_-_rolling_rev_i.pdf
https://www.servicearchive.sram.com/sites/default/files/techdocs/2016_sram_spc_reva.pdf
https://www.bike-components.de/en/SRAM/Red-Brake-Shift-Lever-Spare-Parts-2008-2011-p52916/#product-image
https://www.cxmagazine.com/removing-sram-double-tap-shift-mechanism-single-ring#google_vignette


Tutorials
Cable braked 2x Sram gizzard dithering
Padraig at Red Kite prayer
Joey Mesa double-tap stuff
Joey Mesa double-tap swap (shorter).
Joey Mesa Sram dropper post activater


Share:

Monday, April 27, 2020

Techno-bum-bag


Is that a disco in your bumbag, or are you pleased to see me !

What do yo do when you have weapons grade tail-lights and it's a waste to have them mounted on just the one dynamo bike? Mount them on your bum bag and you are good to go!


A truncated handlebar, with a Qube atop.
I just got 108 hours continuous flashing out of one 18650 rechargeable battery encased in this 2 cell power-bank case. Probably not what the inventor of the Qube, Kerry Staite had in mind when designing ultra efficient tail-lights for dynamo rigs, but I never leave the house without my bumbag anyway, so it makes sense to me. With quite a few bikes to choose from, it's now no longer an issue, as far as rear lighting goes.

I should state that this is an unsanctioned hack, as power-banks all work differently, and Kerry's Qube lights have such a tiny drain that most "proper" power banks don't notice when a Qube is even connected after a while, and they automatically switch off.

Kerry uses some clever super-capacitors in the flashers than mean that they will keep flashing for 3 minutes after being disconnected from their power-source, obviously a very cool set-up for a dynamo scenario.

Anyway, it worked for me with this particular combination of 18650 cells and the power-bank case that I used, so if you want to give it a crack, details are below.

If you think this is overkill then you likely don't commute (like I do) on the highest trafficked heavy vehicle route in New Zealand. Despite lobbying since 1904, there has never been a cycle lane for cyclists riding from Wellington City to the Hutt Valley.


Bits and pieces
1 bumbag with loopy bits on the back. Purchased in Japan.
An old Salsa carbon handlebar.
4 handlebar plugs.
4 zip-ties.

This is my favourite 18650 battery, but you can harvest them any older dead lap-tops, early model Nissan Leafs or Teslas you find at the recycling centre.

Power Bank case from Aliexpress. These cost a few bucks, $3 US. They probably work because they are unsophisticated and don't try to be too clever. These cases are also chargers, so you could put the batteries in and use it to charge them if you wanted. I don't, I have a separate charger that is faster, and that I would trust more, but even then I would not leave the house while leaving any batteries on charge.

K-lite Qube lights.
https://www.klite.com.au/product-page/klite-qube-flashing-safety-light

Recycled 18650 batteries from a dead lap-top battery pack.


Share:

Saturday, March 28, 2020

OPEN U.P. and say aaaaaaaaaah! - 6 monthly check-up

The dentist, the luddite and the Superbike.  
Glossary here.


I suspect it's no coincidence that OPEN make bicycles with model names like OPEN UP and OPEN WIDE. If this is not a clever subliminal marketing attempt at the well-healed "dentist" portion of the bicycle market, then I don't know what is. Unfortunately I do not fit into this demographic in any way, so the following review you may like to take with a grain of salt. Some might say I am more in the Luddite category, but then they would, wouldn't they.

This will be a pretty wide ranging post, because it covers a lot of new ground for me. My first 1x groupset. My first complete through-axle bike, only my second Press-fit bottom bracket, and my first SRAM hydraulic system, vs Avid, or Shimano.

The OPEN U.P. could be regarded as the first high-profile, modern, carbon "All-road" bike, if we disregard the bikes of old, that allowed the use of wider tires than was deemed normal at the time, and may have even been called touring or rando bikes. The OPEN U.P. (Unbeaten Path) was styled so differently to anything else out there at the time, with its fat frame lines and minimalist branding. Most people see it and say, "What brand of bike is that? Oh, never heard of them, where is it made? Switzerland?" It was the complete opposite of the cycle-tourist look, without rando bags or racks, appealing more to the Rapha ethic of minimalist gear, travelling with a credit card, a C02 and a Shakedry in your pocket.


OPEN's timing looked to be perfect with the resurgence in supple and fat tires, 650b wheel-sets, and a move away from road riding where riders have to share with an ever increasing number of cell-phone distracted car users - #gravgrav was becoming a thing.

The running gear out of the box.
Out of the box, the OPEN U.P. came with the Easton/SRAM Force 1x kit. A pretty solid build. Easton EA70ax wheels and bars, Maxxis Rambler tires, a Thomson seat-post and stem, and a very sexy, but painfully narrow Brooks Cambium saddle. The 130mm perch was a good 40mm too narrow for my butt so it was eventually swapped out for a Selle San Marco Regale FX, an acceptable compromise between weight and comfort, but not a serious saddle for back to back long days in the saddle. I also swapped out the Easton bars for some Thomson KFC cross bars which have a very fat and wide feel to them, and a weener UNO stem.


The frame
The frame alone costs more than 3 times the cost of the previous whole bike I bought, so it's pretty much a superbike by my definition. Normally I'd go for a more fiscally conservative option, but the stars lined up and a demo bike became available, along with a "dream-bike-build" pass, from my long suffering wife. My favourite and most adaptable bike up until now has been my Surly Karate Monkey The OPEN U.P. could not be further away than the Karate Monkey, at 1040 grams the OPEN's frame weighs less than the Karate Monkey's fork, but is still 160 grams heavier than the OPEN U.P.P.E.R model, which is significantly more expensive. Be prepared to OPEN UPPER your cheque-book even more for that model. Given the amount of off-road riding I am doing on it, I am happy to have the beefier frame of the U.P., although the designers say the UPPER's frame is no less robust. The guys at OPEN, Andy Kessler and Gerard Vroomen get credit for the dropped chain-stay design that gives them clearance for fat tires and yet still obtain road-bike levels of Q-factor. Q-factor is very on-trend in marketing circles these days, although Shimano seem to be bucking this trend recently with their wider GRX groupset.


The OPEN U.P. is a massive change for me in terms of the technology that passes for normal on many bikes today. It is supposed to be a "quiver killer". You could in theory get rid of your CX bike, your road bike, your touring bike and your bikepacking bike and replace it with this machine. This is assuming a few things. One of the things it assumes is that you have a spare set of wheels and enough gearing to cover all the different scenarios. I did manage to get rid of all of the above bikes, except the road bike, it's just not worth trying to sell.

The OPEN frame has 3 separate bottle cage mount points, which is a must for bikepacking, and a slightly sloping top-tube, which is also great for a frame bag, or even better, a half-frame bag, if you want to use all of those water bottle mounts. It also has mounts on the top-tube which make mounting of a gas-tank very easy, (or even another water-bottle).You can either bore holes in you current gas-tank for mounting, or use magnetic mounts.

The frame fit is interesting. I am 5" 10" and I have short legs, and a long torso, and yet I have a decent amount of seat-post sticking out on my medium sized frame. Typically, I would end up with not much seat-post showing on a medium. I know several people who have accidentally ended up with the wrong sized frame for their bodies, so a bit of research needs to be done to make sure you get it right. I think I have more work to do on nailing my position still. There is plenty more to read about the internally routed cabling of the bike below, but one thing that I found disappointing was that the rear derailleur cable exit point from the chain stay is only really compatible with a road styled derailleur, not a great feature for a bike that you might like to throw an MTB derailleur on. I wonder if it would be possible to have multiple cable exit points? I know of one guy who has managed to by-pass this by routing his cable out the bottom of his bottom bracket and running it on the underside of his chain-stay so he can use a clutched XO 10/11 speed MTB derailleur . A lot of fuss just so he can get clutched 2x shifting, in SRAM. SRAM 11 speed road shifters work with SRAM Exact-Acuation derailleurs in Road or MTB. Not a problem if you are a Shimano GRX user of course. Shimano still believes that there is a place in the world for 2x thankfully. The geometry seems pretty standard by current gravel norms with a 71 degree fork angle and a 73.5 degree zero-set-back seat-tube angle. All I know is that it feels good to me.

Stealth gas tank mounted on the provided location.
Gearing
All of my experiences so far relate to the SRAM Force 1x groupset that it came with, so bear this in mind. I am sure another group-set would yield a completely different result. At this point the gearing is still a bit of an issue for me. Much time has been spent poring over gearing calculators, weighing up the pros and cons of 1x vs 2x. There is plenty of info on the OPEN website about the options, but so far my glass of kool-aid remains full. I still want at least the equivalent of a 44 front and an 11 rear, to nail the long tarseal descents on my commute to work, AND the ability to climb a hill with at least 21.8 gear inches down low, thats a 36/46 front rear climbing combo on 700 wheels.

When delivered, the OPEN came with a 42 tooth chain-ring on the front and a 36 on the back. That is not going to get you very far in Wellington NZ. That's not even 1 to 1. Actually, I found one scenario where it was acceptable, the Tour de Gravel in Marlborough was quite doable with a 42 on the front, for my fitness at the time anyway. Commuting on the flat was alright as long as there is not a lot of extended downhill. The steepest climb I am likely to do is called the "Tip-track" and it is mostly made up from two 15% sections on loose 4wd. With a 650b wheelset on with a 36 on the front and a 46 on the back, it is doable. But then if a couple of days later I wanted to do a local bunch ride, I would have to take the 36 front ring off and replace it with the 42, and swap the wheels. Unfortunately the standard short-length cage Force 1 rear derailleur was pretty hopeless, it only allowed me to shift to a 36 on the back. It was replaced with a medium cage Rival version, which incidentally weighed the same, a portly 271 grams. That's quite heavy for a derailleur that is only supposed to work in 1x mode only. A SRAM Red derailleur weighs in at 145 grams, almost half. Not that I am ever going to buy a new SRAM Red derailleur, but there are plenty of people who will.

SRAM medium-cage Rival derailleur on left, Force short-cage on the right. Rival shifts to a 46, the Force only to a 36.
Bottom bracket
My fear of technology is at its zenith with press-fit BB's and it was no surprise to me that it started creaking pretty much straight away. Bear in mind that this was a demo bike, so it already had some miles on it, you might even think of this as a long-term test, rather than just the 6 months that I have had it. It was a plastic SRAM BB, more on this latter, but it has been perfectly quiet since its replacement. I've not looked up the actual BB height just yet, but it has never been a problem in any of the riding I have done, even on the most technical trails I have never had pedal strike. I am pretty sure the SRAM Force crank-set has 175 long arms.

Is Force 1x or mostly 1x?
Over the time I have had the OPEN I have managed to use a bunch of different front sprockets on this bike, a 36, a 38, a 42 and a 44, with 2 different rear cassettes, an 11-42 and an 11-46, all running the same length of chain, so I started to wonder if it was truly a 1x derailleur . According to the "internet" and the little diagram SRAM did, it's 1x only. I started to experiment a bit with running two different chain-rings on the front in "shift-with-a-stick" mode. On the front I had a 44 and a 36, and on the back I tried 11-42, and 11-46 cassettes. The drive train seemed to deal with it very well. The 44-46 combo was pretty ugly, but everything else was acceptable. So that's an 8 tooth gap on the front. Is that enough to warrant keeping the existing porky derailleur, or would you rather go for a more typical wider range front combo, 46/34 up front, with less of a dinner plate on the back, and a road based derailleur? If you are a weight weener you will know that that the monstrous 1x rear clusters can weigh more than a front double ring and front derailleur combined. This is still largely "1x talk", but relevant in the choices that the OPEN gives you, to deal with the different options as you will see below.

Maxxis Ardents front and rear. Not really enough room for the 2.2 on the back. I swapped to a 2.0 Specialized.

Tires and wheels
I can safely say, I don't have another bike that handles as well as this one. On the road with my 38 mm Compass Barlow Pass tires it inspires a ton of confidence. These really are the default tires on the OPEN for me, as they are still a very capable compromise off road on the dry hard-pack trails around Polhill or Belmont where I do a lot of riding. "Quiver killers" are all about compromise....

The 700 x 43 mm Panaracer Gravel Kings are a very robust tire which I used for the recent Akatarawa Gravel Fondo. They obviously lack the suppleness of the Compass tire, but there is no place for suppleness when riding on parts of the Karapoti Classic course anyway. I probably should have had the 650b wheels on for the Aka Fondo, but I was hoping for an easier ride on the faster stuff. The Gravel Kings still track really well on the road when heeled over at speed, but they obviously feel a lot slower than the Barlow Passes, with their substantial tread. They are a really solid grippy tire. With the 700 wheels it's a good idea to put some tape on the back of the seat-tube as you can get scuffing from the tire, maybe there is a bit of vertical flex in there, I was quite surprised to see it as it appeared to have plenty of room. In fact, I've just checked, and that is my error, the OPEN UP is only specced to accept 40mm tires, not 43mm, because of the diameter, NOT the width. Of course all tires are different in the real world.

SP dynamo hub in 650b. Easton ARC 24 rim.
In 650b mode I am running a Specialized Fastrack Control on the back at 2.0 inches, and a 2.2 Maxxis Ardent on the front. This is a ridiculous tire for a weight weener bike like the OPEN, and at 730 grams the tire weighs 3/4s the weight of the bike's actual frame. (They were cheap). The fat front 650b tire had quite an impact on the handling compared to the 700 tires. Not bad, just different. You get used to it, but it is just obviously more "MTB-like". There is something about the accurate steering of a narrow tire that I enjoy when on the trails on a gravel or cross bike. Despite the weight of the front tire, in 650b mode, the whole bike still weighs less than my carbon road bike. I enjoy the 650b wheels in the weekends on the trails but the default wheelset is the 700c Easton EAX with the Barlow Passes for commuting and unplanned excursions. I've recently swapped the Ardent out for a Specialized Fasttrack S-works 2.0 on the front and it feels really nice.

One of the rear Easton wheel bearings has worn out already and the Carbon-Ti X-12, 12mm  through-axles have taken a bit of getting used to. Once or twice I have failed to torque the rear one up enough and it has come loose mid-ride. It's usually only noticed when shifting deteriorates or you hear a clunk from the rear. Once I had over-torqued the front and was not able to undo it with a multi-tool so I definitely need to re-calibrate my arm.

I have a dynamo wheel built up in 650b and used the 47mm WTB Horizons for a short time. They felt quite dead and slow to me, actually, a lot like an old Specialized Armadillo. The Horizons do look very robust, so it would be a hard decision to pick between them and the 700c Gravel Kings for bikepacking. Having the dynamo in 650b mode would likely swing it. I guess there are plenty of other fast rolling 650b tires to look at as well. The Horizons just look like they should be faster than they actually feel.

K-Lite dynamo lighting kit on the 650b SP hub with an Easton rim. Looking forward to the dark again

Brakes
I was initially very apprehensive about the brakes, having had only bad experiences with Avid hydraulic brakes. The "Easter Island" styled flat-mount brakes have on the whole been a pretty good experience so far. Currently the front one sometimes rubs/squeaks, and sounds like a Grey Warbler under braking, and the rear brake has developed a bias towards one side, which I need to deal with properly. But they are very powerful, which means I tend to ride more on the hoods than I normally would. The high vertical profile gives me confidence that my hands wont bump off in the rough stuff. The discs are 160mm at both ends, and it is very easy to accidentally lock up the rear. In fact, on my first ride off a very steep and wet street, I accidentally locked up and slid into a major road-way. The organic brake pads have not lasted well for me, even in dry weather so I will be going back to sintered metal. One thing I have noticed about the brake levers is that the lever surface is way more robust than that of my buddies Shimano GRX, which seems to have the surface covering peeling off it in a very short time. The fork feels strong and flex-free despite only weighing 390 grams and I have not had a peep out of the Cane Creek head-set to date.

Sram Force. (Easter Island) Very high profile, feel less dorky than they look. No left shifter. DOH! 
Tinkering with bikes
I've always been a tinkerer, its part of the enjoyment I get out of personalising my bike, for aesthetics or performance. It's not unlike the satisfaction that my wife gets out of planting and maintaining her garden. I kind of expect most people to be like this, but I know they are not. This is why I have mostly rejected running tubeless tires for so long. It's not uncommon for me to swap my tires 3 times in 2 weeks, depending on what I am doing, commuting, a Hill Climb, a Gravel fondo. I just cant be bothered with the mess of tubeless. I suspect it's also what happens when you join the "One-bike-for-all" team. But now I've bitten the bullet and got a "tank" and tubelessed my 650b wheels. The 700's had gizz in them when running the Gravel Kings for the Akatarawa Gravel fondo, but a few days later I de-gizzed them and went back to the Barlow Passes with tubes for commuting.

Top, 2x shift with a stick, 44 and a 36 (hidden). 11-42 on the back with Rival medium derailleur. 
The OPEN is a very pretty bike, and to date, I have never read a bad thing about it, apart from the price. But the aesthetic comes at a cost. After swapping out my rear derailleur to get a better gear range, my cable was now deformed, it would not thread back into my new long-cage derailleur. No problem, I will just replace the derailleur cable. Not so fast....

There is a good reason why "dentist bikes" all use electronic shifting.... the cables are all on the inside of the bike. Any time you want to change a derailleur cable on the OPEN, you will need to remove the crank, and bash out the press-fit Bottom Bracket.

This was a very new thing to me. I could not believe it. I emailed OPEN to confirm this, and Andy Kessler, one of the owners of OPEN, to his credit, replied in minutes, (they really are a 2-man company) but I was gob-smacked. To make matters worse, at my local bike shop, the proper extraction tool was not working on the stubborn plastic BB. Eventually we got it out by bashing out one of the bearings independently, as it was causing a very tight fit. Once that was trashed, we were able to whack out the plastic BB shell. This was a very traumatizing experience for someone with a $5,500 dollar light-weight frame, and repeating the procedure every time I need to replace my derailleur cable, or change from a 1x to a 2x set-up does not encourage me to want to tinker with this bike's shifting mechanisms. So yeah, maybe there is a use-case for electronic gears after all. Probably SRAM AXS. It's just a shame I am not a dentist.

Enter here if you want to change your derailleur cable. But first remove the bottom bracket.
I don't think the design of the OPEN has changed much since it first popped out of the mold in 2015, and it's a credit to the designers that it is still one of the most desirable bikes out there. I suspect that other more recent arrivals to the #gravgrav train like the Hakkalugi MX are encroaching on its territory with a dropper-post ready 31.8 mm seat-tube, friendly cable routing access and a better rear derailleur cable exit point to allow the use of MTB derailleurs. The Hakklugi also has a screw-in T-47 BB and mudguard mounts. If I was a dentist with a healthy practice this is one of the bikes I would also be looking at.

Whether you take your OPEN bike-packing or not probably depends largely on your running gear and personal inclination. If you have a cafe/weener build you might like to replace some of those light-weight carbon accessories with alloy ones, and make room to stow away your derailleur charger. I know of a few people who have used theirs for bike-packing and they seem very happy with them. You probably would not want to do the Old Ghost Road on one, but the Tour Aotearoa or the Kiwi Brevet would not be a problem. Not having accessory mount points on the fork is a downside, but I guess you can always buy a new fork for bikepacking, and leave this one looking pretty.

The brave new world of direct mount chain-rings. Kill all your spiders and save a few grams !
The OPEN is an amazing bike. It has become my goto bike for everything. Commuting, hitting the trails, and all manner of events. It's crazy light, it handles like a dream, on and off road, and I do love the colour. For me I feel that it works best in most situations with the 700 wheels, but then again I seem to be using the 650b wheels a lot right now, commuting with the dynamo front wheel. It doesn't make sense that you can have so much fun off-road on a bike like this, that looks pretty much like a road bike.

So I think that covers most things. A lot of what I have mentioned relates to 1x and SRAM's groupset more than it does to the OPEN itself. Initially I was a bit peeved at the 110 BCD SRAM Force crank with its hidden chain-ring bolt nonsense but once I realised how easy it was to remove the crank, and access the chain-ring bolts that way, I got over it. This crank has probably been on and off more times than all the cranks on my other 10 bikes over the last 2 years. The direct drive system for mounting sprockets without spiders was all new to me as well, but rather than getting out an allen key, and a torx driver to change gears, I'm more likely to opt for one of those old fashioned front derailleur things. I guess I am a bit of a Luddite eh?


----------------------------
Tire nerdery appendix
----------------------------
Some recent events 'Ive done in the last 6 months and the tires I have used.

Original tires - Maxxis Ramblers 40mm, (435 grams)
The Tour de gravel - Compass Barlow pass, 38 mm, (360 grams)
The Boganduro - Panaracer Gravel Kings 43mm, (490 grams)
Short test rides - Panaracer Pasela 38mm, (420 grams)
Short test rides - WTB Horizons, 47mm, in 650b (505 grams)
Vets Hill climb - Specialized Roubaix 32/30 (390 grams)
Akatarawa Gravel Fondo - Panaracer Gravel Kings, 43 mm, (490 grams).
Vets Hill climb - Compass Barlow pass, 38 mm, (360 grams)
Casual weekend trail riding, in 650b  - Maxxis Ardent 2.2 (730 grams) + Specialized Fasttrack 2.0 (530 grams).
More Casual weekend trail riding, in 650b  - Specialized Fasttrack 2.0 (485 grams).
Commuting more recently, 650b  WTB Horizon on the front, and a Barlow pass 700 on the back, reverse mullet.

----------------------------
OPEN website
----------------------------
The OPEN website, is one of those frustrating one-page ones. Google is not that kind to OPEN as OPEN is a very common word, as is UP ! The best part of the site is the "Customer build showcase"  and the "blogs" where punters ask Andy and Gerrard questions about gear compatibility and where they announce new initiatives.

----------------------------
Gearing geekage
----------------------------
Combinations of gearing with a SRAM Rival medium rear derailer and a 44/36 shift with a stick double on the front. Running the one length piece of chain. Black cassette is 11-46, silver is 11-42. It seems to tell me that a range of 8 teeth between your front 2 rings means you can get away with a 1x rear derailleur. This could be an acceptable hack for bikepacking.


----------------------------------------------------------------
More disturbing links from a weapons-grade nerd
----------------------------------------------------------------


----------------------------
Terminology/Gossary
----------------------------
Drinking the koolaid: Something that people believe, despite obvious evidence indicating that its not a good idea.
Derailleur: A device that derails and re-rails your chain into an appropriate location in your drive-train - Mentioned 32 times in this post.
1x: A marketing initiative to simplify the drive-train of a bicycle by giving the rider less choice in gearing and creating heavier, more complicated and faster wearing componentry, while simultaneously creating a bad chain-line.
Dentist: A disparaging term for a cyclist who is usually not quite young anymore, and has a job that enables purchase of highly expensive cycling equipment, even if their dedication to cycling as a hobby is not intense or long lasting.
BB: Bottom bracket. What the crank-arms attach to. Conveniently located towards the bottom of the bicycle.
Q-factor: Quack factor, relating to the width of the bottom bracket, and how it might make you feel like a duck when pedaling.
Tubeless: A clever marketing initiative by BIG LATEX to wrest control of the "inflated tire" sector of the market from the conservative tubed area and spawn a massive new component industry around fixing flats, without actually having to touch a tube. Based on the clever Sea Monkeys marketing model of topping up your ever-fattening tire until you can observe (feel) the "latex-monsters" inside. Changing tubes can be complicated and dirty, compared to owning a compressor and blowing gizz all over yourself, at home, on the trail or on the road.
Gizz: Sealant, Stans, tire milk.
Gas-tank: Bento-box, tool-bag that sits on top-tube.
#gravgrav: The new phenomena that is breathing life into a bicycle industry marketing teams. #egravgrav will be next.
#allroad: The predecessor to #gravgrav. A lot more about "spirited riding" than "shredding the gnar".
#gnar: That which must be shredded.
#grinduro: A special event for millenials where it doesn't matter if you get dropped. Everyone is a winner.
#boganduro: A grinduro for bogan millenials.


Share:

Tuesday, February 18, 2020

Cleetus on his Cherubim on Ikigai - Polhil

Share:

Friday, January 24, 2020

Akatarawa Gravel Fondo

This event was the brainchild of Upper Hutt svengali Kim Hurst. It was an awesome event with a short and a long course. 50 kms and 87kms. I patched up some amateur footage from my Gopro.


2677 metres climbing. I rode an OPEN UP with 700C wheels shod with tubelessed  Panaracer 43mm Gravel Kings. Gearing was a 38 tooth on the front and an 11-46 Sunrace cassette on the back. Fitness and traction were more limiting than the gearing.
Share:

Search

Loading

Donate!

If you thought any of this content was in any way useful, enlightening, or even mild interesting, feel free to buy me a coffee!


Powered by Blogger.

Categories

Labels

Featured Post

Tour Te Waipounamu race report

The Tour Te Waipounamu bikepacking race was held in Aotearoa New Zealand, starting on February 14th 2021, it covered 1300 kilometres of rugg...

Followers

Total Pageviews

Search This Blog

Blog Archive

.

Tags

t

Buy me a coffee!

If you thought any of this content was in any way useful, enlightening, or even mild interesting, feel free to buy me a coffee!


Popular last 30 days

Popular all time

Labels

Blog Archive

BTemplates.com